Tuesday, June 29, 2010

Curing Bacon

Curing? Wha?

Curing is the addition of salt, or, in my case, salt, sodium nitrite and sodium nitrate to aid in preserving meat by inhibiting bacterial growth. Curing also draws moisture out of meat and allows it to retain an attractive pink colour when finished. The curing of meat has been practiced for centuries, salting and smoking has been used to preserve meat since Ancient Greece.....

Why haven't I tried it? If the Ancient Greeks could to it, what's stopped me? Fear of the unknown....

Over the last year I've compiled curing agents and all the ingredients I'd need to make bacon, I was hesitant to splurge on a pork belly and fail.... But, Chris you say, remember the Ancient Greeks?

Well, today I threw caution to the wind and went for it. I picked up a 13 pound belly, sliced it into three and got to curing..... Each of my belly portions are around three and a half pounds after trimming some bone and scrappy bits off.

Belly #1

Is getting a brown sugar cure from the Sausage Maker located in Buffalo New York.

Belly #2

Is getting a maple cure, again, from the Sausage Maker in Buffalo.

Belly #3

Is getting a cure of Morton's Tender Quick and honey.

What has worried me has been the ratio of curing agent to the amount of meat. Using Tender Quick, the package says to use a tablespoon per pound of meat, easy enough. With the packaged Sausage Maker cures I was informed to "Thoroughly rub the dry cure into the bacon." Ummm ok, again I used about a Tablespoon per pound, maybe a tiny bit more, we'll see how it turns out.

I decided to keep my recipe simple, I'd love to make a paprika or peppered bacon, but, I figured I'd better keep it simple to begin with. If these turn out well, I am going to be in trouble....

Update Day 6

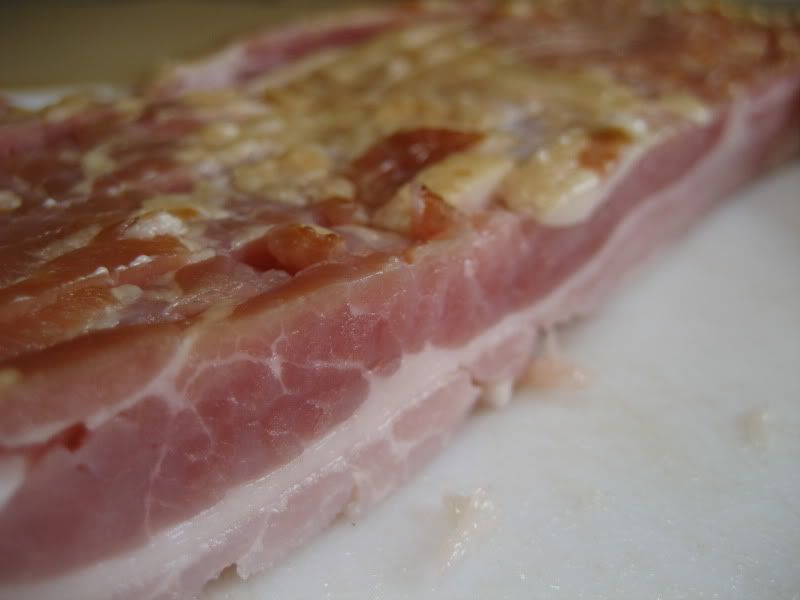
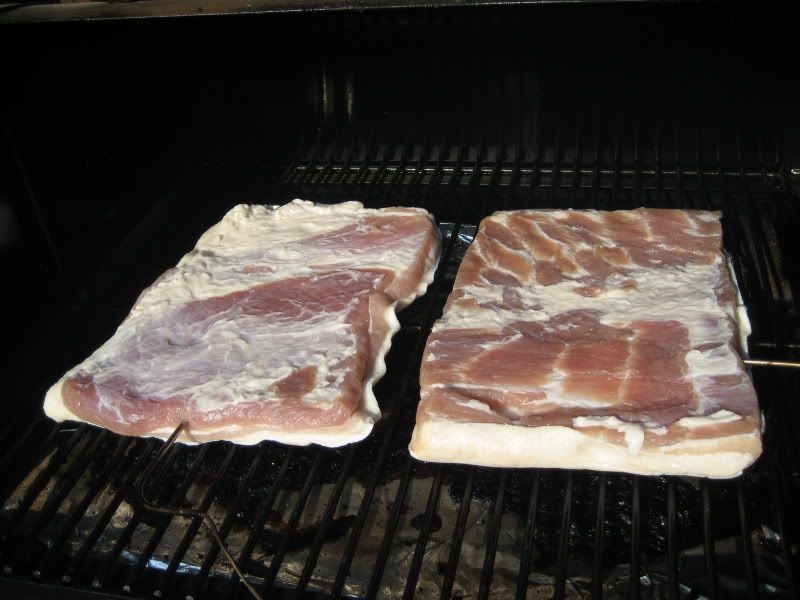
Almost immediately the cures drew out quite a bit of liquid from the bellies. I massaged the packages and turned them over once every day to ensure that the curing liquid was evenly distributed in the Zip Lock bags. I had a minor incident part way through the curing of the brown sugar bacon. For some reason the seal on the bag leaked and let some of the cure out. Luckily it was the thinnest and still had some liquid in the bag. After 6 days in the cure I decided to prepare the bellies which had all firmed up nicely.


Photobucket


I rinsed the bellies well under running water and dried them off with paper towels and let them sit for half an hour while the smoker warmed up. I placed them on my Traeger Lil Tex smoker set on the "Smoke" setting which should run between 180°F and 200°F, but, with my luck a heat wave began today. The outside temperature was 28°C (82°F) at 9am when I started smoking the bellies and the cooker ran at 230°F most of the time.


Photobucket


They took just over an hour and a half to reach 130°F internally (I am not eating the bacon right from the smoker, I am going to fry it first). If I was going to sample pieces straight from the smoker I'd take the internal temperature to 150°F to make sure it was cooked through.


Photobucket
Photobucket
Photobucket


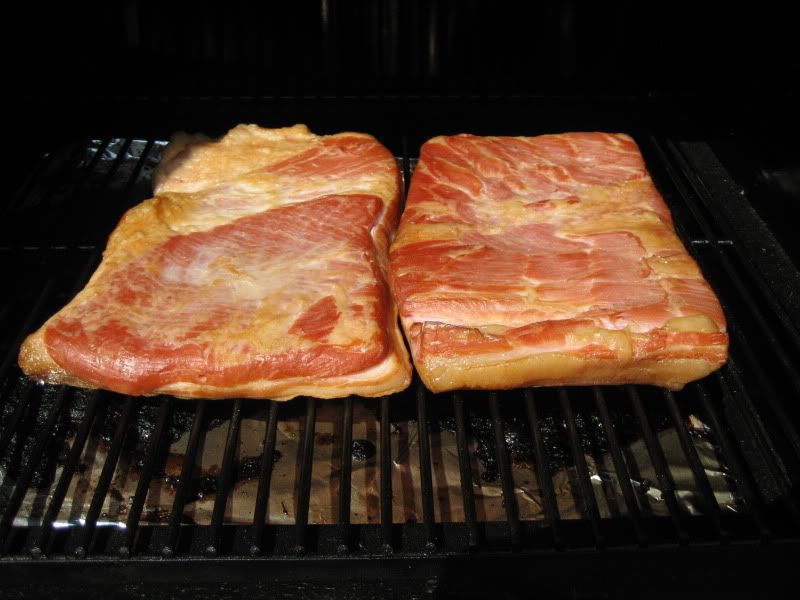
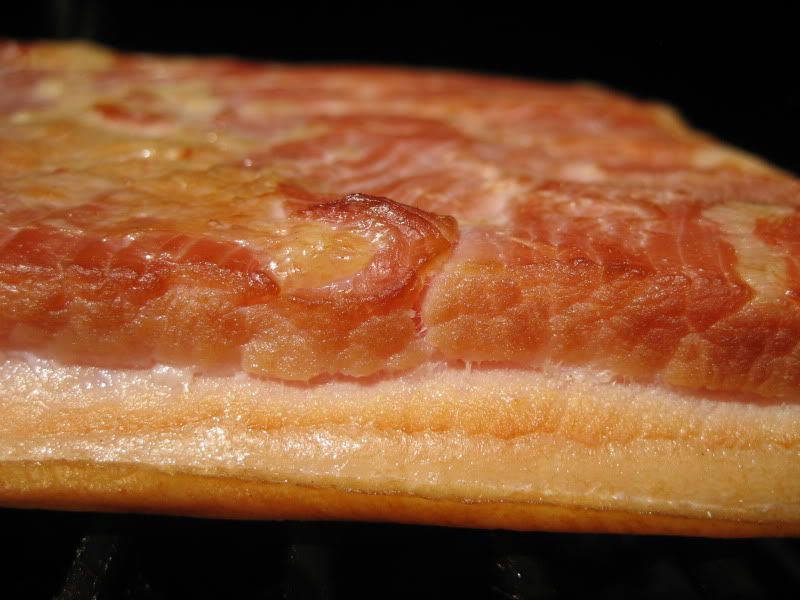
The bellies did develop some nice colour, they would have been darker if the cooker had run a little cooler. I cut off the rind when I took the bacon from the cooker and let them cool. They are now in the fridge getting ready for BLTs for dinner.

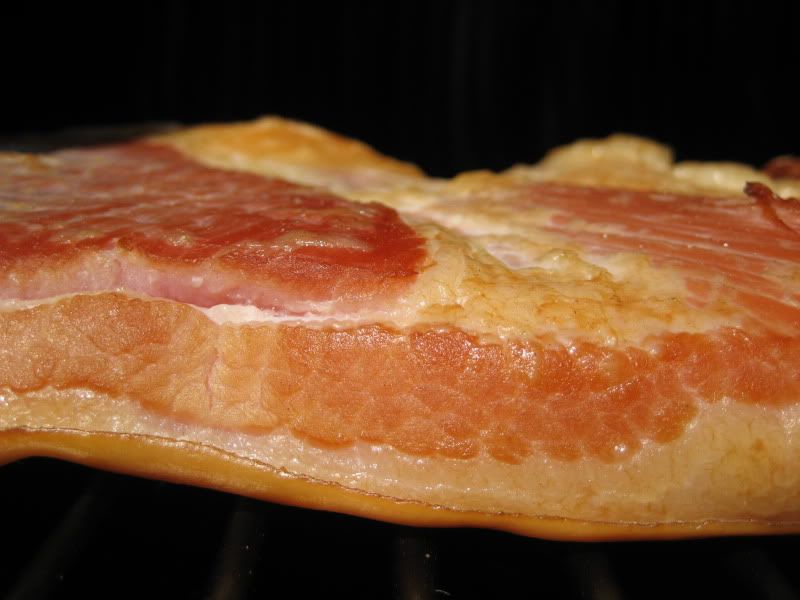
I didn't want to overload the Traeger so I did the Sausage Maker bellies first and when they were finished I did the Tender Quick/honey belly. The outside temperature was 33°C (91°F) when I put the last belly on the smoker. The Traeger was in the shade and ran a bit cooler than in the morning, varying from 195°F to 230°F. The pellicle seems a bit thicker than the pre-made cures and the didn't darken as much as the maple and brown sugar cured bellies. We'll see what the taste is like when I fry some up.... All in all, it was a very simple project, to this point I don't know why it appeared so daunting...


Photobucket
Photobucket


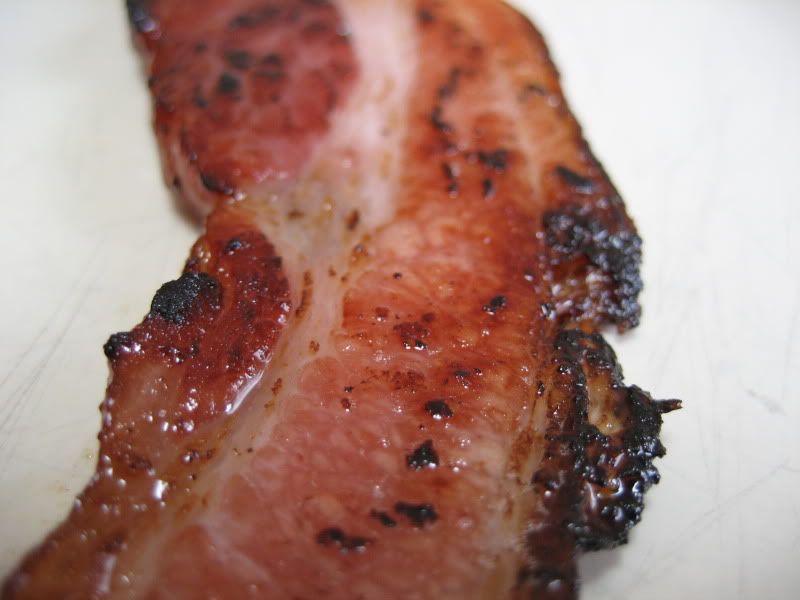
The results? Very good bacon. The Sausage Maker cures turned out on the salty side, next time I will use a little less and be more precise in my measuring. The main issue I had with these cures is that I couldn't pick up any brown sugar or maple notes once cooked..... As a curing agent they were fine, I would have to say as flavoured cures they were a miss.

The real winner was the Tender Quick and honey cure. It had the perfect amount of salt and once cooked, I could pick up the aroma and taste of honey right off the bat. The only thing is that I'll need to remember to cook it over a lower heat, the sugars in the honey tended to darken in the pan quicker than the Sausage Maker cures when cooked side by side.

As a side note, I let the bellies firm up in the fridge before trying to slice them. I used a 14 inch granton edge slicing knife to slice the bacon. A long, sharp knife and some patience is all you need to cut thin, uniform slices of bacon. If I was to do a lot of production, a meat slicer would be handy, but, for now I'm set.

Is it wrong I am itching to head to the butcher for more bellies?


Photobucket
Photobucket
Photobucket

Tuesday, June 22, 2010

Pizza Pino's Restaurant & Tavern

As part of my new excercise regimen, I broke my mountain bike out of storage last week. I quickly realized that the tires needed to be replaced and my trip computer was broken. Time for some repairs! As I drove down to the local bike shop I noticed Pizza Pino's Restaurant & Tavern (855 Westney Rd. S.) in Ajax, a place that I had heard about a few times but had never tried. Today I stopped in.

In my previous 'fatter guy' life, I'd tell you how much I loved pizza, that I could probably eat it every day and never tire of it. Nowadays I don't eat it often. Some of my favourite holes in the walls have been pizza joints like Antonio Pizza just outside Montreal, Calabria Bakery and Fratelli Village Pizzeria in Scarborough, and Bocce Club Pizza in Buffalo. Each have their own style, Bocce Club and Antonio Pizza come heavily topped with a hearty crust while Calabria and Fratelli's are thin crusted, wood burning oven pizzas.

Pizza Pino is very similar in style to that of Bocce Club and Antonio Pizza, probably more so the latter (Montreal style) because of it's crisp crust (Bocce's is more breadlike).

I got a large (14") pizza with pepperoni, bacon and green olives ($18.85). I was told the wait would be 25 minutes, a good sign.

When my order arrived the box was very heavy for it's size. When I got it home I was met by this:


Photobucket


Impressive, loaded with toppings and very well cooked, the crust was nicely browned and it smelled heavenly.


Photobucket


I tugged a piece loose and went at it. The crust had stayed amazingly crisp, the cheese was extremely thick, and there were piles of bacon, pepperoni and olives hidden underneath.

How was it? The sauce wasn't spectacular, actually, it tasted somewhat like spaghetti sauce but it was perfectly fine. The pepperoni was similar to what you can get in a supermarket. I prefer a harder, more zesty pepperoni but this is fine as well. The bacon was diced (unlike the pictures on their website). My only complaint is that the cheese doesn't have a great melt to it. It retained a rubbery texture once cooked. It's amply applied, it just seemed like a 'cheese product' to me.

Overall I really liked the pizza, it fills a niche that's definitely lacking in this area. Price wise, it's not too much more than local chains and the product is far superior. When I'm craving a Montreal style pizza it'll be my go to place from now on.


Photobucket


Author's note: Dear Pizza Pino or their webmaster, I have no problem sharing my photos. It would have been nice to have been asked to use the first photo in my blog post (of the complete pizza) rather than simply taking it and posting it on your web site.

Sunday, June 13, 2010

Charbroiled Garlic Parmesan Oysters

About 10 years ago I tried my first oyster on the half shell. A plump, sweet, fresh-from-the-Gulf of Mexico, Apalachicola oyster. I was hooked.

Living toward the middle of the country, I have always been wary of the freshness of seafood. This has kept me from purchasing my own oysters. Instead, I have relied on one of the few oyster bars we have in the city for my fixes (which have, sadly, been few and far between). The problem with an oyster bar is their markup. Having inherited a touch of my mom's frugality, the oyster bar is basically a once a year trip. I'm always amazed how quickly costs soar for a night out. I frequently wondered how many oysters I could buy from a seafood distributor and shuck myself for the equivalent of night out at the oyster bar.

Earlier this winter I was directed to a local seafood purveyor (Diana's Seafood) that gets in a wide variety of fresh oysters and I went to check them out. They had numerous east and west coast oysters (Crassostrea virginica, Crassostrea sikamea, Crassostrea gigas) and Irish Flats (Ostrea edulis) with trade names for most.

On my oyster scouting visit to Diana's I tried some Kumamoto (C. Sikamea) and Colville Bay (C. virginica) oysters and was very impressed with the freshness of their wares. This past week after reading Robb Walsh's Sex Death and Oysters, I had to try some charbroiled garlic parmesan oysters which Walsh talks about in the book. I headed back to Diana's to get a couple of 33 count boxes of Standard grade Malpeque oysters which were on sale.

This recipe is based on a recipe from Drago's Seafood Restaurant, located in both Metairie and New Orleans Louisiana.

Charbroiled Garlic Parmesan Oysters

Ingredients

36 oysters
1/4 pound room temperature butter
3 cloves of garlic finely minced
4 Tbl grated parmesan cheese

Procedure

Fire your charcoal in a chimney starter while you get to work on the garlic butter and oysters. Mix together the softened butter, parmesan and garlic. Shuck your oysters trying to reserve their liquor in the bottom cupped shell.* Place the shucked oysters on an aluminum sheet pan for easy assembly and transport. Add a dollop of the butter to each oyster and take them to your grill.

Once all of your charcoal has lit, spread your coals evenly in your grill and place the oysters on the grate directly over the hot coals. Depending on the distance from the coals, the oysters will take three to five minutes to cook. You want to remove the oysters once the gills have curled and they have charred a little around the outside of the shell. Don't be alarmed if they flare up! The oysters will bubble and spit and some butter will fall on the coals, this is normal. Actually, it's desirable as a little extra char adds flavour to these beauties.

Enjoy Hot!

*I don't recommend using a premium oyster (save them for eating raw on the half shell). A Gulf Coast C. virginica is perfect here because they are relatively cheap, plump and large enough to still give you a decent sized finished product. The oysters will shrink a lot while cooking, so, if you're going to shuck 'em, make it worth your while!

Here are some shots of the Standard Malpeques I did over the weekend, they were small and many were tough to shuck, but, man were they good!


Photobucket
Photobucket
Photobucket

Thursday, June 10, 2010

Update #2

I've been slipping recently, sneaking in a few of my previous vices and being a little lax on my caloric intake. Saying that, I finally hit the 40lb mark this week. I've been yoyoing around the 38 pound mark for the last month and will have to recommit myself to the cause....

Down 41 and feelin' good!